Nokia DCT 3 Flashing
If you want to flash one of these Nokia phones:
2100, 3210, ,3310, 3330, 3410, 402, 5110, 5210, 5510, 6110, 6150, 6210, 6250, 7110, 8210, 8250, 8850, 8890
then please read the tutorial below:
There are so many flashing programs out there it was difficult to pick the best one to use for this tutorial. In the end I decided to use my personal favourite which is a program called KNOCK. The reason for this is that although it flashes your phone quite slowly it is the most reliable. Also KNOCK will work fine on all operating systems including 95, 98, ME, XP without the need for extra configuration. The downside to this flashing program is that it has a rather unfriendly user interface. But this tutorial will show you that it is easier to use then many people think!
You will need:
1) One set of DCT3 parallel port flashing cables (Dejan 1.00B interface)
They cost aprox £20
2) A program called KNOCK (download it here) free thanks to NUTZO!
3) A standard comm port data cable (either m/f bus or pure mbus will be ok)
NB you can not flash DCT3 phones with just standard comm port data cables!
Step 1 - Backup Your Phone!
If you are a beginner at flashing the safest thing to do first is to backup the entire flash memory of your phone. This means that if there are any unforeseen mishaps you can restore your phone to its previous good health.
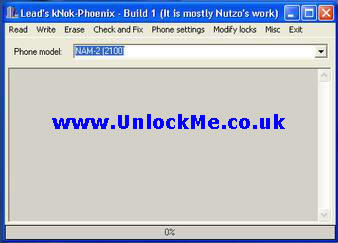
If you haven't already, DOWNLOAD KNOCK HERE. Then run knok95.exe, you will see the flashing interface below:
Connect your flasher cable to the parallel port of your computer and then connect your phone. MAKE SURE THE PHONE REMAINS POWERED OFF!
Now from the drop down box select the model of phone you wish to flash (in this tutorial I will use 5210 as an example). Then select the 'Read' menu from the title bar. Click on the 'Read full flash and store as FLS' option (see screen shot below). The program will then prompt you to press the power button of your handset for a short time.
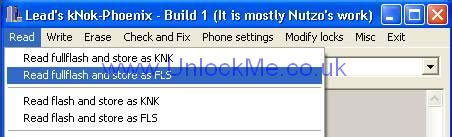
When you press the power button the phone WILL NOT switch on but the program will kick into action. KNOCK is very clever in that it automatically knows the memory Addresses to read the full flash from each model of phone.
Now it is time to sit back because as i mentioned this program takes its time (aprox 20 min's). :-)))) When you become more confident at flashing you may decide not to bother with making a backup.

When KNOCK has finished reading your phones flash memory, it will display the message 'OK' in the bottom of the status window. KNOCK places the recently created backup file in the same directory as its self. For example a 5210 full flash backup would be named like the file to the right.
That's the backup file created, hopefully you will never need to use it. In fact if you follow my tutorial carefully you almost certainly won't! :-))
Step 2 - Flash Your Phone!!
We are now ready to write the new software version to your phone. First download the flash file for your phone from my downloads section and save it to a location that is easy to find.
welcome to high quality 1:1 rolex daytona 116500 mens rolex calibre 7750 hands 15mm.rolex copy rolex air king 114200 70190 mens rolex calibre 2813 pink dial automatic utilized beautiful build to exhibit the company in neuro-scientific leading expert requirements.
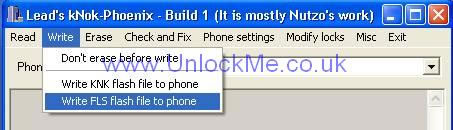
Now from the drop down box select the model of phone you wish to flash (in this example I am using a 3330). Then select the 'Write' menu from the title bar. Click on the 'Write FLS flash file to phone' option (see screen shot below).
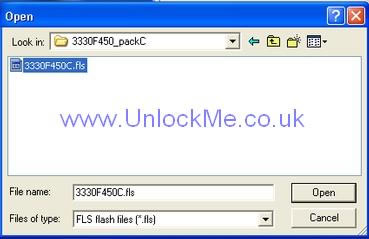
You will then see a select file dialog box appear. Simply select the flash file you have downloaded from my site for your model of phone. In this example I am flashing a 3330.
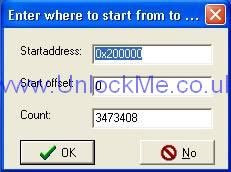
Once you have selected the correct file to flash to your phone, KNOCK will want to know what address you would like to start writing the file at within the phones memory. The window to the right will be displayed. These default values are fine, DO NOT CHANGE THESE UNLESS YOU KNOW WHAT YOU ARE DOING! The default values start writing the file at the very beginning of the phones flash memory - and that's exactly what we want to do!! :-)) So just click the OK button.
Now When prompted press the power button briefly on your handset, you should see KNOCK kick into life. Just sit back and relax as the erasing/writing process will take approximately 10 minutes (KNOCK is not very fast!). When the writing process has finished KNOCK will display an "OK" message.
Step 3 - Update the FAID (Flash Authority ID)
Now That you have successfully written the flash file to your phone there is just one final step required. Your phone should power on at this point but it will keep on restarting and will not receive a signal. The reason for this is that when you alter the flash memory within your phone there are certain security checksums that need to be updated. The checksum that we need to update is called the FAID (Flash Authority ID) and you will be glad to here that it is quite a simple process! Although it is possible to update the FAID within KNOCK, for the sake of this tutorial it is more straight forward to use a program called Rollis Nokia Tool.
Download Rollis Nokia Tool HERE. Then connect your phone to a standard data cable (Mbus or Fbus). Run Nokia Tool and you will see the window below.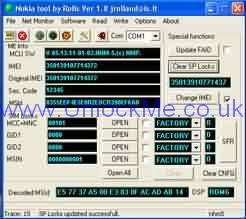
This software is very clever in that it will auto detect which type of data cable you are using (either pure M bus or auto switching F/M bus). To get the software to auto configure itself for the data cable and com port you are using just press the following button (found at the top right of the tool bar):
![]()
After a few seconds you should get a "Found Phone" message. (if not check you data cable is well connected to your handset). Now the software is configured press the "read phone info" button at the top left of the tool bar.
![]()
Remember if you are using this software under XP you will need to change the compatibility mode of the exe to windows 98.![]()
All that you need to do now is press the "Update FAID" button. The software will display a small successful message in the status bar of the window.![]()
Just for good measure you should finish the entire process by performing a factory reset. To do this simply press the button labeled "SFR" (special factory reset)
Having problems with the above tutorial??
If for some reason you are having problems with the above tutorial you should post any questions in my forum. Also it is well worth checking out the following flashing tutorials from other GSM sites (which use different flashing software but just as good)!
Link 1
Gsm Info DCT3 flashing tutorial
Another excellent tutorial, again this uses Rollis flasher as apposed to KNOCK.
If you know of any other good DCT3 flashing tutorials please email me and I will place a link here! (use Contact Me link)
![]()